템플릿 패턴이란?
알고리즘의 골격은 부모 클래스에 고정하되, 세부 단계는 자식 클래스에서 구현하도록 하는 방식.
샌드박스 패턴이란?
외부 코드나 하위 시스템이 메인 시스템의 핵심 API에 직접 접근하지 못하게 하고, '제한된 인터페이스(Sandboxed API)'만을 통하도록 강제하는 전략
템플릿 패턴 구현
1. 액터로 WeaponBase 하나를 만든다.

2. 해당 액터를 상속한 C++ 클래스인 WeaponTemplateBese를 만든다.


3. WeaponBase에 총에서 사용할 것들을 미리 넣어준다.
// Fill out your copyright notice in the Description page of Project Settings.

#pragma once

#include "CoreMinimal.h"
#include "GameFramework/Actor.h"
#include "WeaponBase.generated.h"

UCLASS()
class MYPROJECT_API AWeaponBase : public AActor
{
	GENERATED_BODY()

public:
	// Sets default values for this actor's properties
	AWeaponBase();

protected:
	// Called when the game starts or when spawned
	virtual void BeginPlay() override;

public:
	// Called every frame
	virtual void Tick(float DeltaTime) override;

	UPROPERTY(VisibleAnywhere, BlueprintReadOnly)
	TObjectPtr<USceneComponent> Root; // 루트 컴포넌트

	UPROPERTY(VisibleAnywhere, BlueprintReadOnly)
	TObjectPtr<class UArrowComponent> FirePoint; // 방향만 가르쳐준다.

	UFUNCTION(BlueprintCallable)
	virtual void Fire(); // 총 쏘기

protected:
	// 소모되는 탄약 수
	UPROPERTY(EditAnywhere, BlueprintReadWrite)
	int AmmoPerFire;

	// 남은 탄약 수
	UPROPERTY(VisibleInstanceOnly, BlueprintReadOnly)
	int CurrentAmmo;

	// 탄약 보유량
	UPROPERTY(EditAnywhere, BlueprintReadWrite)
	int MaxAmmo;

	// Rate of Fire 연사속도
	UPROPERTY(EditAnywhere, BlueprintReadWrite)
	float RoF;

	// 유효 사거리
	UPROPERTY(EditAnywhere, BlueprintReadWrite)
	float Range;

	// 데미지 양
	UPROPERTY(EditAnywhere, BlueprintReadWrite)
	float DamagePerHit;

	// 사격 가능 여부
	UPROPERTY(BlueprintReadWrite)
	bool CanFire;

	// 연사 속도 제어를 위한 핸들
	UPROPERTY(BlueprintReadWrite)
	FTimerHandle TimerFireDelay;


	// 타이머 연결할 함수
	UFUNCTION()
	void HandleFireDelay();

};
Ammo는 Ammunition의 줄임말이다.
4. 생성자 만들고 함수를 구현한다. 이후 WeaponBase는 건드리면 안 된다.
cpp파일에 ArrowComponent.h를 include 한다.
#include "Components/ArrowComponent.h"
// Fill out your copyright notice in the Description page of Project Settings.


#include "WeaponBase.h"
#include "Components/ArrowComponent.h"

// Sets default values
AWeaponBase::AWeaponBase()
{
 	// Set this actor to call Tick() every frame.  You can turn this off to improve performance if you don't need it.
	PrimaryActorTick.bCanEverTick = true;

	Root = CreateDefaultSubobject<USceneComponent>(TEXT("Root"));
	RootComponent = Root;

	FirePoint = CreateDefaultSubobject<UArrowComponent>(TEXT("FirePoint"));
	FirePoint->SetupAttachment(RootComponent);

	AmmoPerFire = 1;
	CurrentAmmo = 0;
	MaxAmmo = 12;
	RoF = 1.f;
	CanFire = true;
	Range = 1000.;
	DamagePerHit = 100.f;

}

// Called when the game starts or when spawned
void AWeaponBase::BeginPlay()
{
	Super::BeginPlay();

	CurrentAmmo = MaxAmmo;
}

// Called every frame
void AWeaponBase::Tick(float DeltaTime)
{
	Super::Tick(DeltaTime);

}

void AWeaponBase::Fire()
{
	// 일정 시간마다 사격할 수 있게 하기
	CanFire = false;
	GetWorld()->GetTimerManager().SetTimer(TimerFireDelay, this, &AWeaponBase::HandleFireDelay, 1.f/RoF, false); // RoF는 속도 배율이 된다.
}

void AWeaponBase::HandleFireDelay()
{
	// 일정 시간마다 사격할 수 있게 하기
	GetWorld()->GetTimerManager().ClearTimer(TimerFireDelay);
	CanFire = true;
}
헤더 쉽게 찾는 방법


무슨 헤더를 포함시켜야 할지 모를 때는 Ctrl+T로 해당 객체를 검색하고 cpp파일을 열어 최상단의 헤더 목록을 확인한다.
세로 윈도우 만들기

5. WeaponTemplateBase.h를 작성한다.
자식 클래스를 만들어 cpp로 구현하는 방법과 블루프린트로 구현하는 방법 두 가지가 있다. 이번에는 블루프린트로 작성한다.
// Fill out your copyright notice in the Description page of Project Settings.

#pragma once

#include "CoreMinimal.h"
#include "WeaponBase.h"
#include "WeaponTemplateBase.generated.h"

/**
 *
 */
UCLASS()
class MYPROJECT_API AWeaponTemplateBase : public AWeaponBase
{
	GENERATED_BODY()

public:
	virtual void Fire() override;

	UFUNCTION(BlueprintCallable, BlueprintNativeEvent)
	void Reload();

protected:
	UFUNCTION(BlueprintNativeEvent) // C++에서 기본 구현하고 블루프린트에서 오버라이드 가능한 함수
	bool CheckAmmo();

	// 총을 어떻게 쓸지
	UFUNCTION(BlueprintImplementableEvent) // 블루프린트에서 작성하는 함수
	void ProcessFiring(); // 라인트레이스 쓰는 함수

	// 이펙트 실행
	UFUNCTION(BlueprintImplementableEvent)
	void PlayEffects();

	// 총알 업데이트
	UFUNCTION(BlueprintNativeEvent)
	void UpdateAmmo();

};
BlueprintImplementableEvent는 구현하면 오류가 나므로 cpp에 작성하면 안 된다.
BlueprintNativeEvent처럼 블루프린트와 C++ 하이브리드 함수로 구현하는 경우에는 C++ 코드 함수명에 _Implementation을 넣어줘야 한다.
// Fill out your copyright notice in the Description page of Project Settings.


#include "WeaponTemplateBase.h"
void AWeaponTemplateBase::Fire()
{
	if (!CanFire) { return; }

	if (CheckAmmo())
	{
		// 순서를 마음대로
		PlayEffects();
		ProcessFiring();
		UpdateAmmo();

		Super::Fire();
		return;
	}
}
void AWeaponTemplateBase::Reload_Implementation()
{
	CurrentAmmo = MaxAmmo;
}
bool AWeaponTemplateBase::CheckAmmo_Implementation()
{
	return AmmoPerFire <= CurrentAmmo;
}
void AWeaponTemplateBase::UpdateAmmo_Implementation()
{
	CurrentAmmo -= AmmoPerFire;
}
이 상태로 WeaponTemplateBase를 상속받은 C++ 클래스 TemplateWeapon_Pistol과 TemplateWeapon_Shotgun을 만든다.


블루프린트와 C++ 코드 중 겹치는 함수가 있을 경우 코드가 우선이다.
Pistol 블루프린트


이벤트노드를 우클릭하여 부모 노드에 대한 함수 추가를 진행한다.
상속받은 블루프린트는 함수를 불러올 때 블루프린트 부모를 먼저 호출하고, 그 후에 C++ 클래스 부모를 호출한다.


Shotgun 블루프린트
Pistol 블루프린트를 그대로 복사-붙여넣기한다.

그리고 Get Forward Vector 뒤의 범위를 변경한다.

라인트레이스는 한번에 쏘는 탄환 수만큼 For Loop로 실행한다.


샌드박스 패턴 구현
템플릿 패턴과 반대로 기능을 만들어놓고 조립하는 방식. 약간 특이한 기능을 구현하고 싶을 때 사용할 수 있다.
1. WeaponBase를 상속한 SandboxWeaponBase를 만든다.

2. BlueprintImplementableEvent를 만든다.
BlueprintImplementableEvent를 사용하면 virtual을 사용할 수 없다. 그래서 원본 클래스인 WeaponBase의 UFUNCTION 속성을 변경하면 안 된다. 대신 우회해서 사용하는 방법을 쓴다.
virtual void Fire() override;

UFUNCTION(BlueprintImplementableEvent)
void SandboxFire();
-> 같은 기능을 하는 BlueprintImplementableEvent 형식의 다른 함수를 만들고, 원래 virtual void Fire에서 호출한다.
void ASandboxWeaponBase::Fire()
{
	SandboxFire();
}

// SandboxFire는 BlueprintImplementableEvent이기 때문에 구현부를 만들면 안 된다.
이렇게 하면 원본을 바꾸지 않고 BlueprintCallable 가상함수를 BlueprintImplementableEvent로 바꿀 수 있다.
UFUNCTION 블루프린트 관련 옵션
BlueprintCallable
UFUNCTION(BlueprintCallable)👉 블루프린트에서 함수 호출 가능
BlueprintPure
UFUNCTION(BlueprintPure)👉 값만 반환, 실행 핀 없음 (순수 함수)
- 상태 변경 ❌
- getter 느낌
BlueprintImplementableEvent
UFUNCTION(BlueprintImplementableEvent)👉 C++ 구현 없음, 블루프린트에서만 구현
BlueprintNativeEvent
UFUNCTION(BlueprintNativeEvent)👉 C++ 기본 구현 + 블루프린트 override 가능
3. 함수를 작성한다.
// Fill out your copyright notice in the Description page of Project Settings.

#pragma once

#include "CoreMinimal.h"
#include "WeaponBase.h"
#include "SandboxWeaponBase.generated.h"

/**
 *
 */
UCLASS()
class MYPROJECT_API ASandboxWeaponBase : public AWeaponBase
{
	GENERATED_BODY()

public:
	virtual void Fire() override;

	UFUNCTION(BlueprintImplementableEvent)
	void SandboxFire();

	UFUNCTION(BlueprintCallable)
	void Reload();

protected:
	// 총알 체크
	UFUNCTION(BlueprintCallable)
	bool CheckAmmo();

	// 총쏘기
	UFUNCTION(BlueprintCallable)
	void LinetraceOneShot(FVector Direction);

	// 사운드
	UFUNCTION(BlueprintCallable)
	void PlaySound(USoundBase* Sound);

	// 총알 업데이트
	UFUNCTION(BlueprintCallable)
	void UpdateAmmo();
};
// Fill out your copyright notice in the Description page of Project Settings.
#include "SandboxWeaponBase.h"
#include "Kismet/GameplayStatics.h"
#include "Components/ArrowComponent.h"
void ASandboxWeaponBase::Fire()
{
SandboxFire();
}
void ASandboxWeaponBase::Reload()
{
CurrentAmmo = MaxAmmo;
HandleFireDelay();
}
bool ASandboxWeaponBase::CheckAmmo()
{
return AmmoPerFire <= CurrentAmmo;
}
void ASandboxWeaponBase::LinetraceOneShot(FVector Direction)
{
FHitResult Hit(ForceInit); // ForceInit으로 강제 초기화 가능
FVector Start = FirePoint->GetComponentLocation();
FVector End = Start + (Direction * Range);
UKismetSystemLibrary::LineTraceSingle(
this,
Start,
End,
UEngineTypes::ConvertToTraceType(ECC_Visibility),
false,
{this, GetOwner()},
EDrawDebugTrace::ForDuration,
Hit,
true,
FLinearColor::Red,
FLinearColor::Green,
5.f
);
}
void ASandboxWeaponBase::PlaySound(USoundBase* Sound)
{
UGameplayStatics::PlaySoundAtLocation(this, Sound, GetActorLocation());
}
void ASandboxWeaponBase::UpdateAmmo()
{
CurrentAmmo -= AmmoPerFire;
}
4. SandboxWeaponBase를 상속받은 Pistol, Shoutgun 블루프린트를 만들어준다.


Pistol
BlueprintImplementableEvent 함수를 구현한다.


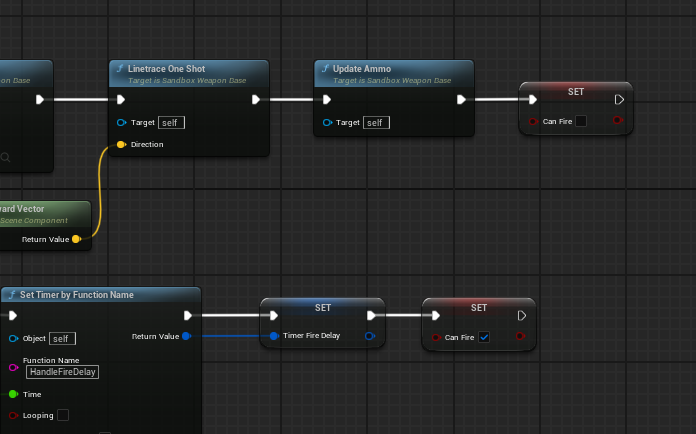


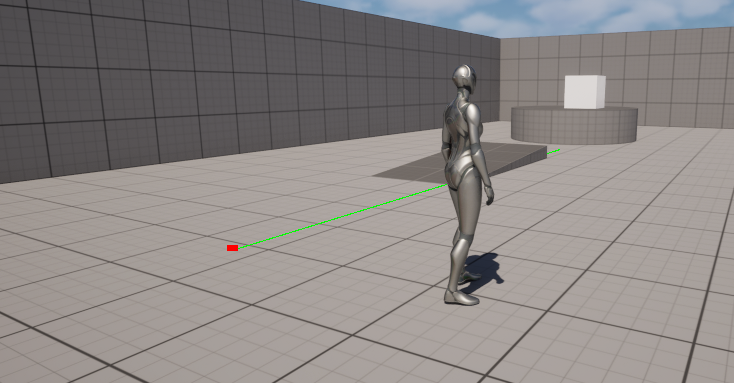
Shotgun 블루프린트


'게임 개발 > 학습 일지' 카테고리의 다른 글
| 언리얼 마스터 머티리얼 만들기 (0) | 2026.05.10 |
|---|---|
| 언리얼 내배캠 마스터반 수업 과제 - 샌드박스 패턴으로 기존 과제 구조 변경 / 우클릭 조준 구현 (0) | 2026.05.07 |
| 언리얼 C++ - 파티클과 사운드로 게임 효과 연출하기 (0) | 2026.04.30 |
| 언리얼 엔진 심화 3주차 - 콜리전, 트레이스 및 데미지 타입 (0) | 2026.04.30 |
| 언리얼 C++ - UI 애니메이션 효과 및 3D 위젯 UI 구현하기 (0) | 2026.04.29 |